Extended Reality(XR), which encapsulates virtual, augmented, and mixed reality, is increasingly becoming a popular and crucial sector to invest in. Because of this, many are finding ways to make their contributions in this evolving sector, including me! When it comes to creating wonderful virtual and augmented reality experiences, it has become a known fact that frame rates must be faster than what the human eye expects, to keep users fully immersed. This is why I spent 6 weeks in XR Bootcamp’s Rendering Optimization Masterclass, which focused on optimizing the rendering process and increasing FPS in Unity to create smooth immersive XR experiences.

Before we dive into what the course entailed, I’d like to start off with what my end goal was for taking on the learning path. For the longest time, I’ve tracked and written about Extended Reality(XR) manufacturers and studios, who have persistently been designing devices and creating XR content. Some of my web logs(blogs) about them can be found at Around Your Screen. It was my blogs that propelled me into code. Code Html. Code CSS. Code JavaScript. Code Webpack. Code React. Code React-Three-Fiber. Code GLSL. Code Linux. Code Nginx. Code Code Code.
My passion for building XR experiences stemmed from my childhood, where my ever-growing interest in game development and a compelling need to become immersed in the digital world became a part of my identity. I even imagine myself as being from the first generation of kids who grew up with gaming consoles in their homes, and how growing up with these systems became natural for us. Now that I am well into my adulthood, XR is the next progression towards encapsulating people’s minds to provide a different style of living than what is traditional.
Through persistent research, reflecting, and implementation of code skills, it became apparent that I would need to learn how to optimize rendering VR applications to meet the ever-stricting render performance requirements for immersive experiences that I seemed to lack. Hence why I took the XR masterclass.
The XR Rendering Optimization Master Class is six weeks long with a Unity project due each week. Each of the Unity projects is designed to re-enforce various XR rendering optimization techniques taught for the respective week. For the last two weeks, we are tasked with the final challenge of optimizing a game that runs less than 5 frames per second on the Meta Quest 2 mobile XR headset. A game that runs at about 30 frames per second even on its best day. And for VR, that is a big NO-NO because this causes a nauseous experience for the user. 72 frames per second is the minimum threshold required for comfortable immersive digital experiences. This is where the “Bootcamp” in XR Bootcamp comes from. To get an unoptimized, non-native XR game running at least 72fps on Quest 2 mobile XR headset in less than 2 weeks. I was sweating, crying tears, and swearing a lot!
But what is a Masterclass without its Master? For me, I was delighted with Ruben Torres as our cohort’s mentor. If you have not heard of him, he is the Game Dev Guru who has 10+ years in optimizing graphics rendering performance for Unity projects, working for companies such as Ubisoft, Wooga, Audi, and Volkswagen. His immense insight into boosting games performance and pushing XR experiences to meet the minimum standard 72 fps requirements, has led him to even release a free XR Optimization Guideline which you can download here. But for me and my XR Bootcamp cohort, he was there to show us personally how to apply optimization techniques, specifically for the Meta Quest 2 and VR mobile headsets. Did you ask what techniques he was enlightening us with? Well... I cannot spoil too much but will share a few things I learned.

The first week was about getting familiar with Unity and the rendering pipeline process. Such as what rendering operations are handled by the CPU and which ones are handled by the GPU. Or how virtual 3D environment points translate to the 2D screen space. Before one can learn the techniques for optimizations, one must know how graphics rendering works in general. During this week, we also became familiar with a very popular tool used for GPU graphics debugging. Getting RenderDoc installed, and profiling working was part of the first week’s assignment.
Week two was all about getting a sample Unity project ported over to the Quest 2 headset and setting up additional troubleshooting tools used for tracking down performance bottlenecks. This is also the week we learn a very succinct way of troubleshooting and reaching performance goals, which I will just state them as "P3" here- (learn more in the free guideline by Ruben).
"One very important note I will share here for Meta Quest experiences to keep at 72 frames per second, is that each frame cannot last longer than 13ms."
The Unity Profiler is one such tool we learned for getting a general overview of the rendering processes of each frame and the amount of time each one is taking. This tool helps us determine if performance bottlenecks are stemming from the CPU or GPU side.
Now that we have suitable tools at our disposal, know how to port Unity projects to XR, and the P3 optimization steps, it was time for us to learn what we could do to combat performance bottlenecks. Week three provided us insight into how Shaders play a significant role in the graphics rendering pipeline and how to improve virtual reality rendering. Since the Quest 2 headset is equipped with the Snapdragon XR2 GPU(a tile-based GPU), we were introduced to a new tool for checking how expensive a Shader is on a tile-based GPU.
After being able to check how expensive a Shader is with this tool, we then learned how we can optimize the Shader to be Quest 2 friendly. This week, I’ve learned that Shaders can wreck chaos on graphics performance if not careful with their implementation.
For week four, we learned even more valuable tricks for improving graphics rendering performance for games. Also, the importance of doing minimum changes on a project for maximum results. This included adjusting settings found throughout the Unity interface for optimizing textures and meshes. And a way to prevent too many unseen objects from rendering on the screen. With so much learned throughout the first four weeks, it was time to take on the Hell Week project. Getting a terribly performing desktop game optimized at 72+fps on the Quest 2 headset.
"The Hell Week project did initially seem intimidating and was meant to."
I’m glad I did take the time to learn the tools and techniques for performance optimizations, as I was able to define a structure for troubleshooting and implementing rendering optimizations for the scene. The first step was to get the Unity project set up for Oculus Quest 2 platform. Then collecting relevant metrics to get a general overview of the render pipeline bottlenecks for improving virtual reality rendering. It did take one scratch project and various iterations of the Start Area before I was able to spot a comfortable workflow for testing various optimization methods to work on other parts of the scene.
It is important to not only know all the rendering optimization techniques for improving a Unity project’s performance for the target platform but also in which order to try and test these rendering optimization techniques. This also falls in line with the 80/20 rule for optimizing time spent on a project. Rather not want to spend time on an optimization technique that would be minimally effective, before trying one that would be most effective. This is another lesson learned during the Rendering Optimization Master Class.
In our last cohort meeting, we had to explain our process on how we got the nightmare project running at 72 frames per second. Which... I will detail my Hell Week journey ahead.
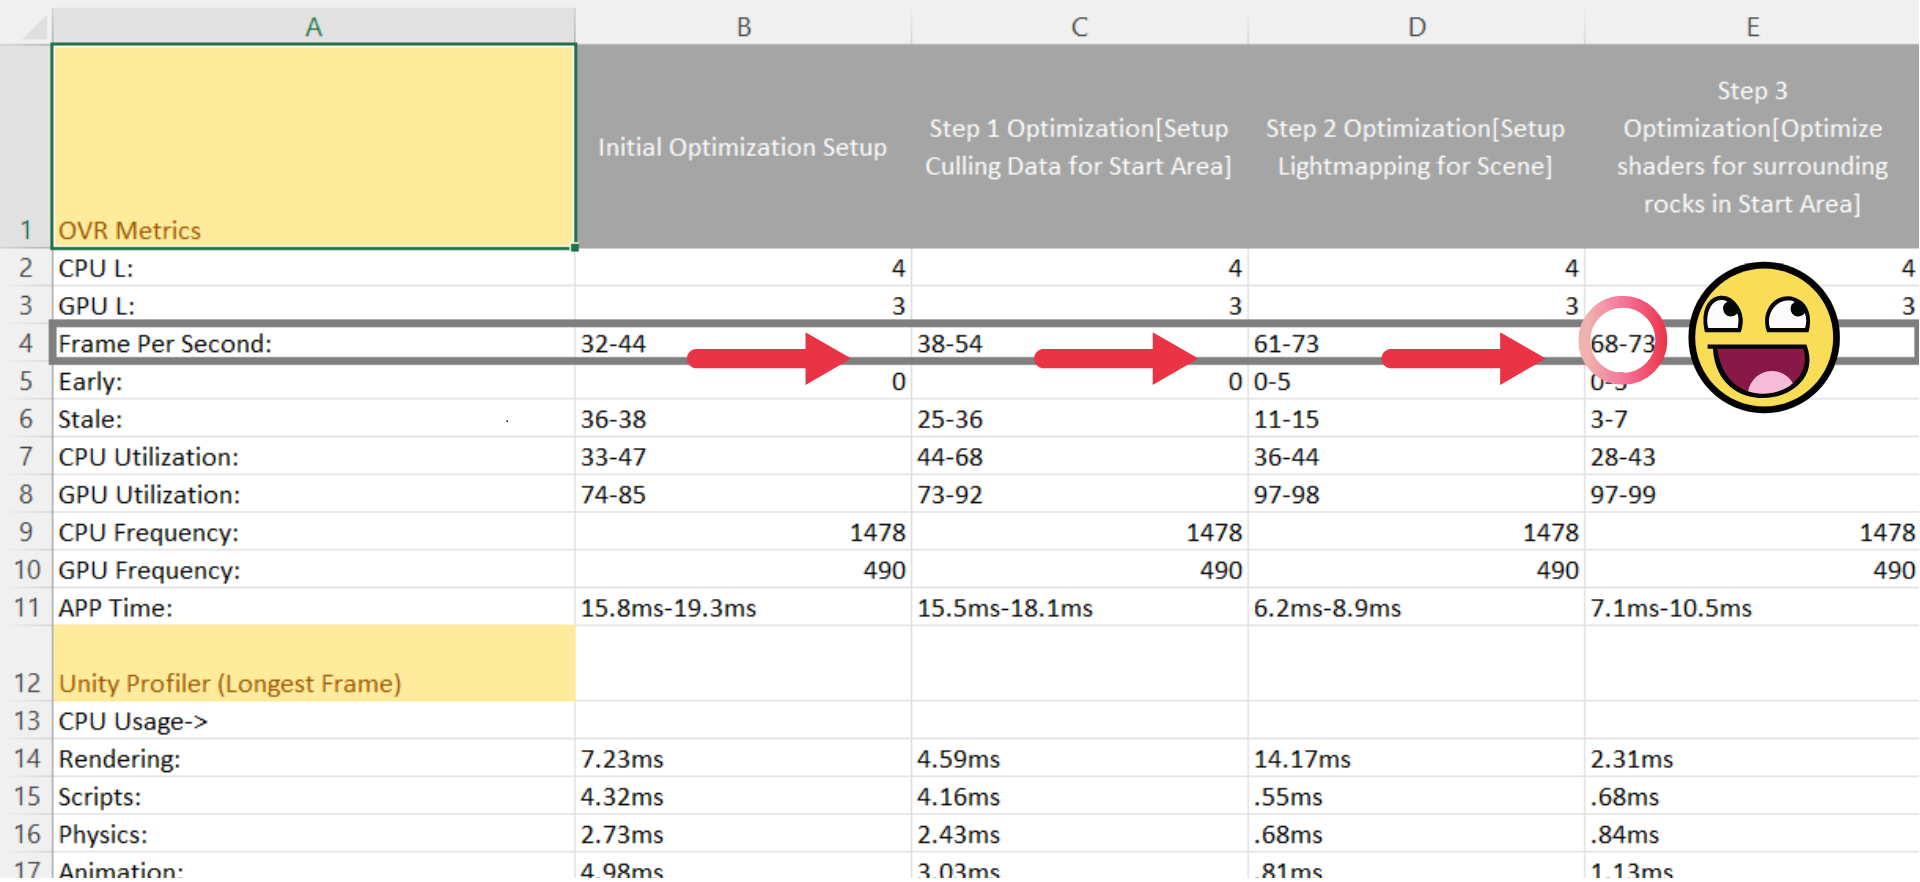
I’m very proud of my progress! A snippet of metrics recorded from OVR Metrics and Unity Profiler, showing my progress in VR rendering optimization with Unity
The game handed to us to optimize was the 3D Game Kit from Unity. The Hierarchy of the GameObjects was one of the first things I had to familiarize myself with, as they were not efficiently grouped together as per area of the scene. Making it just a bit difficult for only troubleshooting GameObjects render performance impact in a specific area without having to traverse back and forth through a lot of directories. This prompted me to group all GameObjects in the Start Area under the same parent GameObject. At least for improving workflow. This also allowed me to search through the grouped GameObjects for any specific render optimization techniques that can be applied for the specific area when it comes to reducing draw calls.
After restructuring the Hierarchy, I then jumped right into reducing vertices and triangle count for the GameObjects in the Start Area. Doing this render performance optimization step, did improve the frame rate, but not too significantly, as it was hovering around 35fps. Increasing 30fps to 35fps is not a bad improvement, but still leaves a lot of room to reach the required 72fps.
Seeing the minute performance boost, I set up occlusion culling to control which objects were being rendered, based on if they were in view of the camera or not. This did provide another boost increasing frames per second slightly, but not quite enough. At this point, I was basically throwing every optimization technique I learned at this project, but was not seeing the type of render performance boost I wanted while still maintaining good visuals.

What to do now? I already had Meta Quest 2 virtual reality rendering performance metrics noted down from the different techniques previously implemented. I also had the initial optimization steps performed, such as adjusting Unity quality settings to target Quest 2. And at this point, had a decent troubleshooting structure on which optimization techniques to start implementing first to improve project optimization time.
I ended up scratching the initial Unity project and setting up a new one, to have a refreshed state of the project. Then from there, the first thing I did was set up occlusion culling to prevent the GPU from rendering GameObjects that will not be viewable by the camera. After setting this up and testing metrics, I then set up lightmapping for the scene and tested render performance metrics afterward.
After setting up the crucial lighting, I went to check for and optimize the Shaders that were assigned to the GameObjects of the scene’s start area, to be compatible with the Quest 2 headset. As a note, this made a significant difference in performance on Quest 2. Enough to where I was able to set the visuals back to full resolution. I then went and checked the texture and mesh compression settings for textures and meshes assigned to the Shader.
"...Performing these steps, while implementing the P3 optimization steps, I was able to get the Start Area pushing at 72+ frames per second. You cannot imagine how proud I was and how proud Ruben was of my results!"
To pull this story of my journey through the Rendering Optimization Master Class by XR Bootcamp short, I’ve learned a valuable skill set for getting Unity projects running at 72fps on the Meta Quest 2. More generally, how to get Unity projects running at 72fps or more for any target platform. And more specifically for the future of XR experiences, how to make mobile XR experiences enjoyable by the masses by improving CPU and GPU performance.
Not only has the masterclass positioned me for better jobs in the XR industry, my own cohort has played a crucial role in preparing for and passing interviews for these demanding jobs, through mentoring and critical feedback. I am very excited to elevate my career with this course. To me, there is no limit to what can be achieved now, as this is the ribbon that ties up the gift that I can present to XR studios and the like.
Thank you for reading through my detailed journey with XR Bootcamp and the insightful knowledge gained for optimizing virtual reality experiences. This Master Class has indeed re-enforced my confidence in optimizing non-XR Unity projects for XR. Even better, to create new compelling XR experiences. I'm really glad I took the XR Bootcamp Master Class, and can highly recommend you take a course too! I call it one of the more rewarding things I’ve done recently, in terms of learning. For an individual like myself, seeking to contribute to the growth of the Extended Reality(XR) industry, it is an honor to be trained by those who are professionally contributing to this sector.